As an NVIDIA Solution Advisor, Kinamo maintains a VMware vSphere cluster for a VMware Horizon VDI deployment of one of our customers. The ESXi hardware hosts are equipped with NVIDIA Tesla GPUs to accelerate graphical processing for the clients.
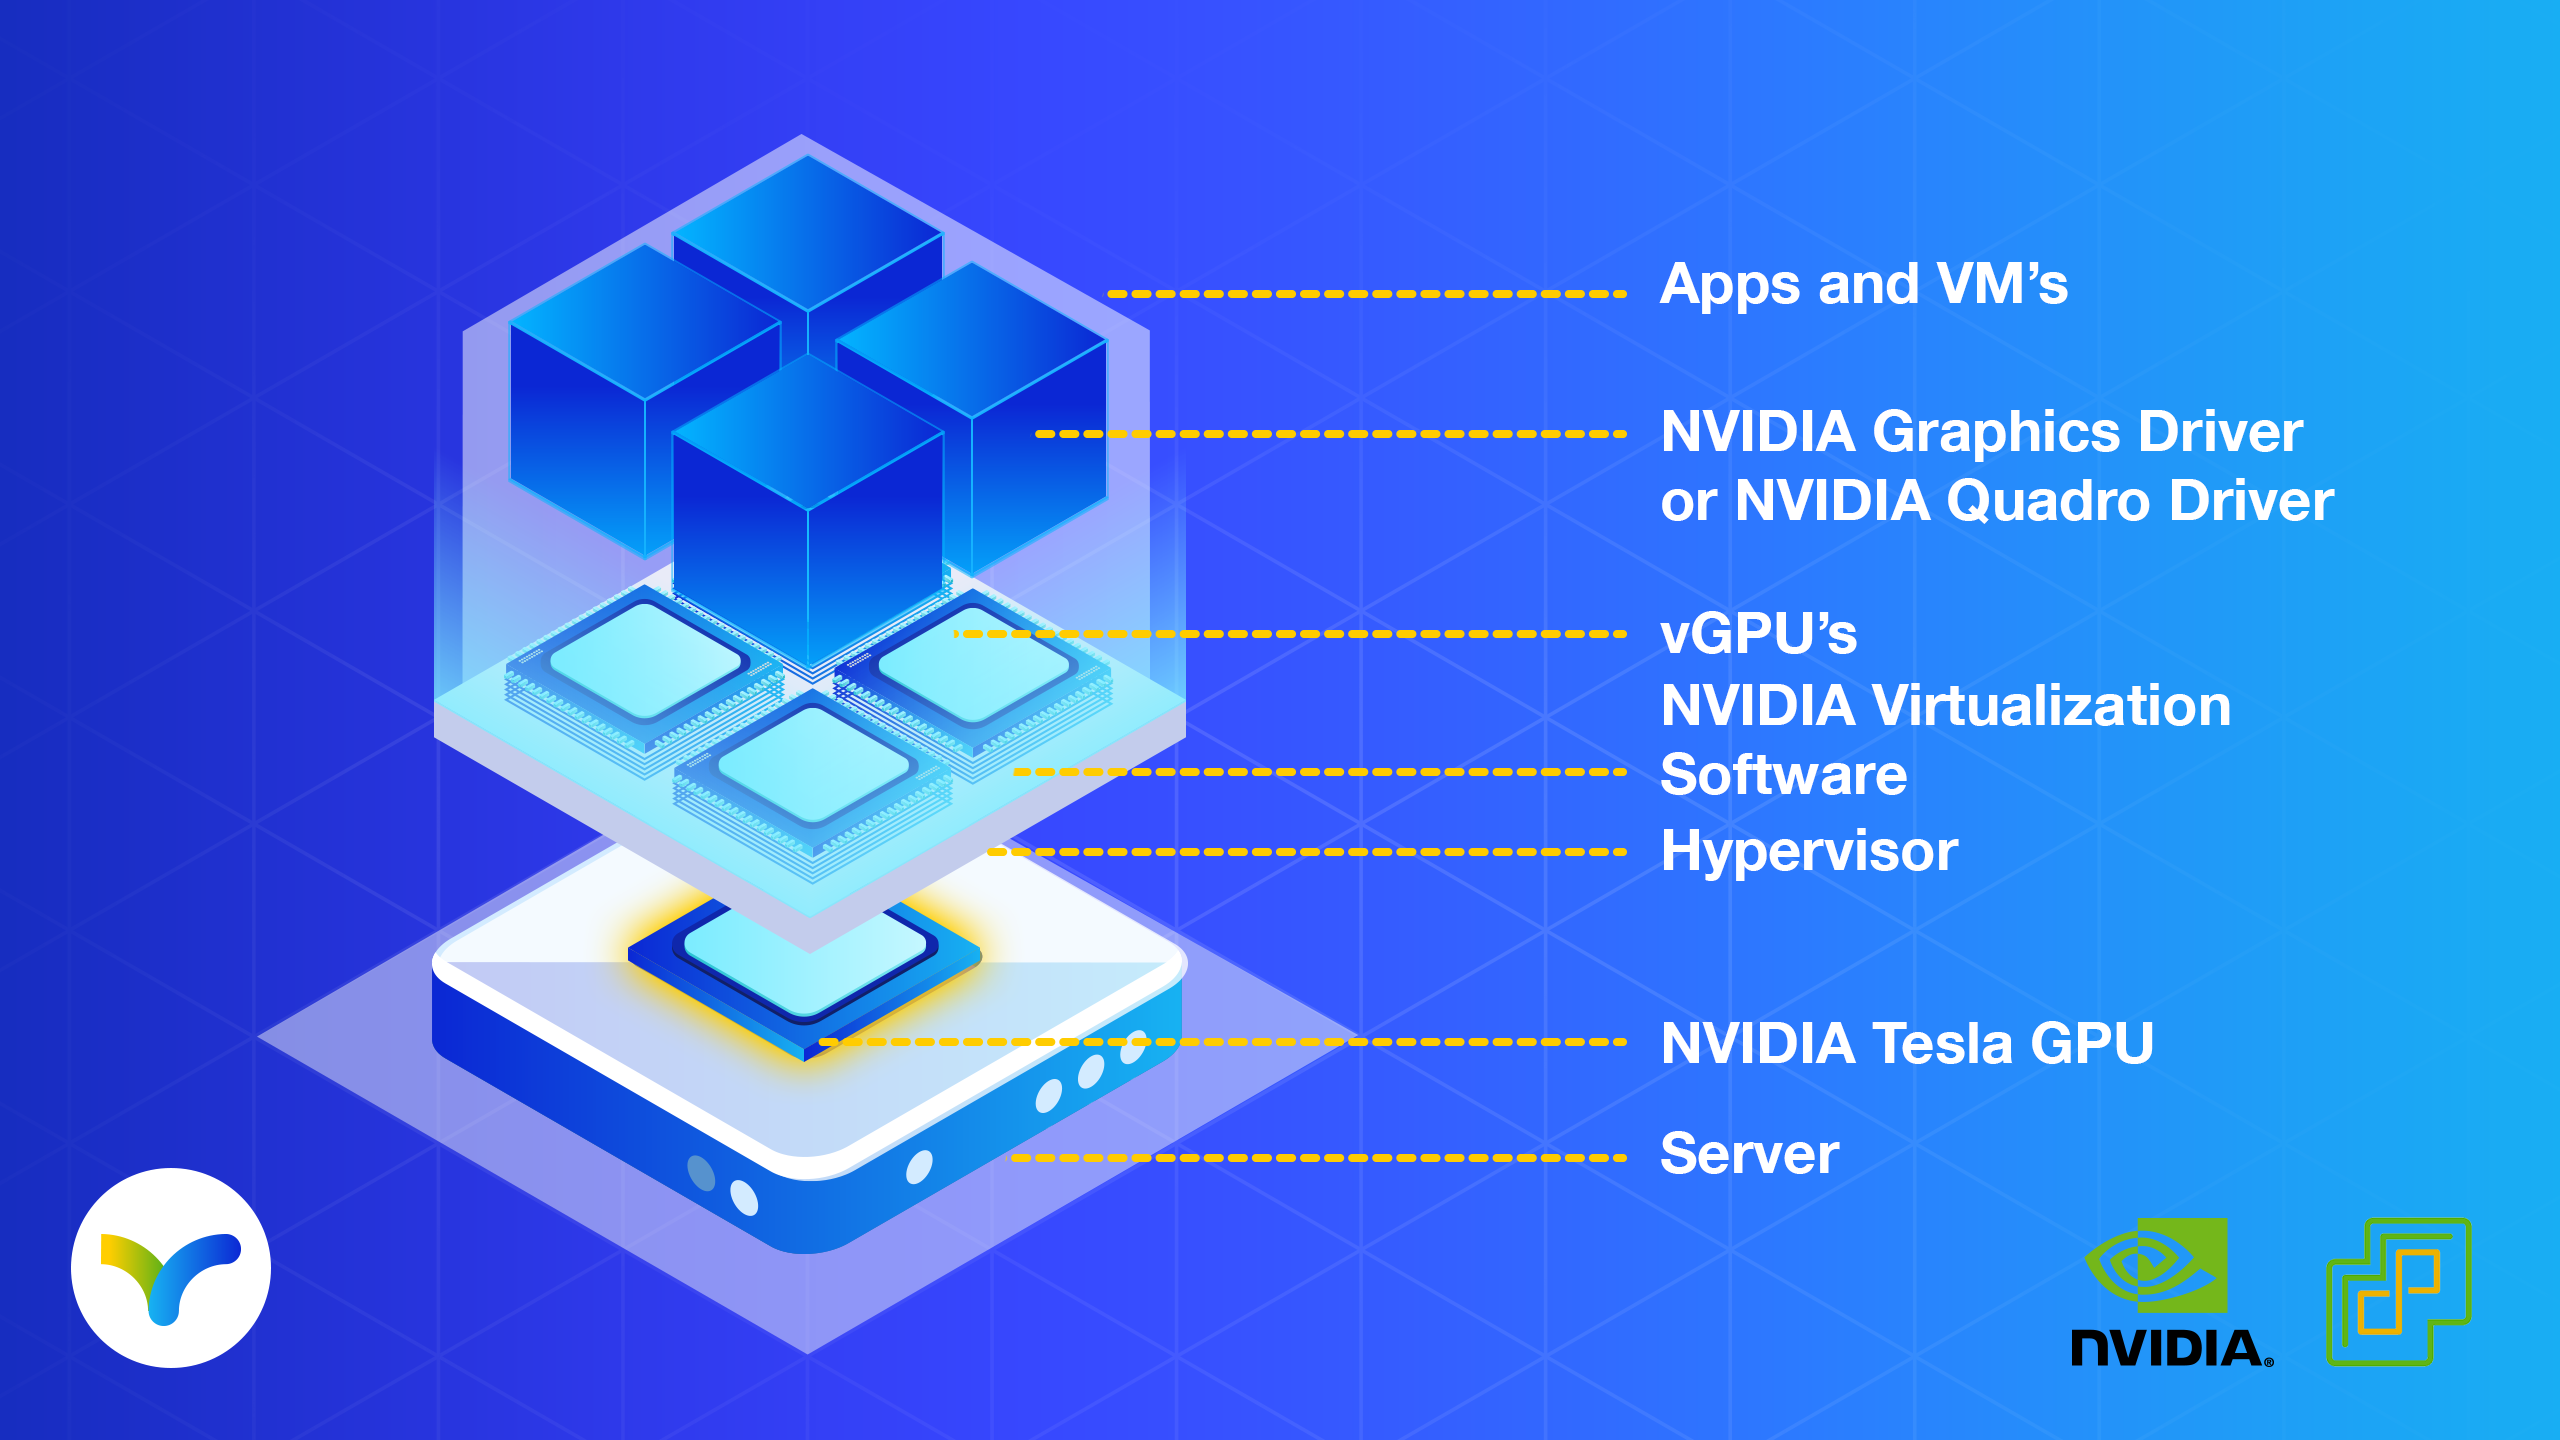
NVIDIA Virtual GPU (vGPU) enables multiple virtual machines (VMs) to have simultaneous, direct access to a single physical GPU, using the same NVIDIA graphics drivers that are deployed on non-virtualized operating systems.
Installing NVIDIA vGPU ensures that all of our client virtual desktops have unparalleled graphics performance, computing performance and application compatibility, together with the cost-effectiveness and scalability brought by sharing a GPU among multiple workloads.
This article covers how to install the NVIDIA vGPU for ESXI through vCenter lifecycle manager, in detail.
To fully utilize the GPU acceleration inside the VDI guests, a driver needs to be installed in the ESXi host operating system.
According to the official guidelines, the NVIDIA Virtual GPU Manager or vGPU driver has to be installed using the command-line esxcli tool.
However, installing additional drivers or VIBs in vSphere can also be done using the web GUI.
We will not be covering the aging update manager of previous releases, this article will cover installing the NVIDIA vGPU driver on vSphere 7.0 using the new Lifecycle Manager.
Installing your updates through Lifecycle Manager and thus the Web GUI is great for people who are uncomfortable with the CLI, but also allows you to keep the single image functionality of vSphere.
Single images define the complete software stack of the ESXi hosts in a cluster. Needless to say, the machines should stick to this stack so that an updated image can be rolled out later using Lifecycle Manager. Failing to do so may open up your environment for future problems due to both human error or automated errors, as the deployed software will not be visible inside the update screen and so can be easily forgotten.
Additionally, by using the VMware Lifecycle Manager, you will not have to pass the warnings saying you are performing unsupported actions and you will not have to open up SSH, even for a short period, which may be a violation of your security policy.
In short, we like to have all installed components available in the software depot of Lifecycle Manager, and not manually installed on the ESXi machine, to keep the solution easily maintainable and auditable!
Step-by-step guide to add software to the Lifecycle Manager
The first step is adding your software to the Lifecycle Manager. Here we will assume you have already downloaded the correct package from the NVIDIA Licensing portal (in our case “NVIDIA-GRID-vSphere-7.0-450.142-450.142.00-453.10.zip).
When extracting this file, you will notice there is a second, much smaller, ZIP file inside. In our release it is named “NVD-VGPU_450.142-1OEM.700.0.0.15525992_18219284.zip”. This file contains all needed information for vSphere, and the VIB (Vsphere Installation Bundle) file.
Using the menu of the vSphere web client, open the Lifecycle Manager. Open the “Actions” menu, next to the “Lifecycle Manager” title and select “Import Updates”.

Browse on your computer to the second ZIP file – in our example “NVD-VGPU_450.142-1OEM.700.0.0.15525992_18219284.zip” – and click “Import”.
Your vGPU driver should now be imported in the Lifecycle Manager Image Depot. You can verify this by clicking “components” and applying the filter “nvi” to the “Name” column. Your NVIDIA vGPU driver should show up, in our example it is version 450.142.
Next up, edit your update image.
Using the menu, go to “Hosts and Clusters”, select your cluster and open the “Updates” tab. Here you can see your current image, we will click “EDIT” in the top right corner to modify this image.
Select your preferred ESXi version for the image, select the Vendor Add-ons for your server (if desired), skip the firmware field (unless necessary for your setup) and at the components part, click the “Show details” link after the text “No additional components”.
Your screen should now look like this:

Continue by clicking the “ADD COMPONENTS” link and select your imported “NVIDIA vGPU driver for VMWare ESX” component from the list. And of course, click “SELECT” in the bottom right corner.

Your edit image screen should now look something like this:

Verify the made selections and hit the “SAVE” button.
Your image is now ready to be rolled out to the cluster, with the NVIDIA vGPU driver included.
Kinamo, VMware & Nvidia
Kinamo has more then 18 years of experience in cloud hosting, DevOps, development and managed hosting services.
As with all Kinamo services we love the “out of the box” kind of projects that require a step-out-of-your-comfort zone approach.
We’re proud about the fact that we can offer accessible and expert support to our clients with a personal touch, thanks to our specialist team here in Antwerp, Belgium.
Do you have a question about this article? Or are you wondering if this accessible and expert support in Antwerp is real? Let’s talk.